Thứ Sáu, 4 tháng 3, 2011

self reflection

david | mentalray,rendering,tutorials | Monday, October 1st, 2007

Sometimes it is desireable to render in layers or passes that will be combined in post production. This give the compositor more control especially when integrating CG with live action. You may choose to render passes like diffuse, shadow, occlusion, specular, reflection, depth - the list goes on and the choices depend on many factors.
What I want to demonstrate here is a way to tackle a reflection pass using some of the new maya 2008 shaders. Actually I am going to use a new "unsupported" shader - so... you have been warned.
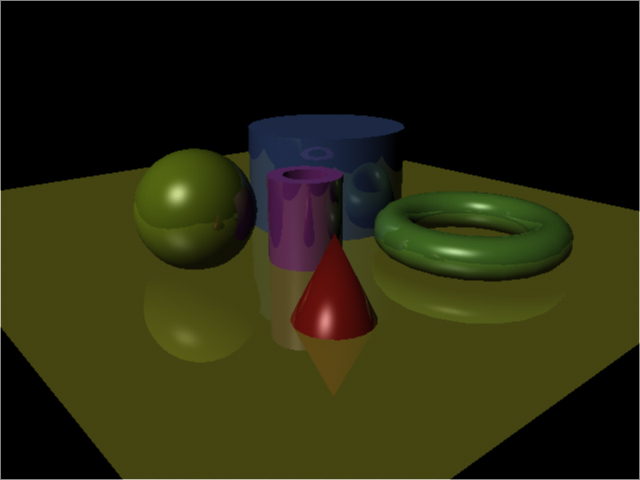
First, a render of some reflective surfaces.
beauty.jpg
One way to get a "reflection pass" is to make the diffuse components of all the shaders black. That way we are left with just the reflections. Here is the result if I do that.refl_result_noSelf.jpg
The problem is that the sphere is reflected in the cylinder and the ground, but it's reflection is black. What we really want is colored reflections and to do that we need the new mip_rayswitch shader.
mip_rayswitch was included in maya 2008 as an "unsupported" shader, which means it was hidden away. To expose it you need to edit a mel script called mentalrayCustomNodeClass.mel (C:\Program Files\Autodesk\Maya2008\scripts\others). Right at the end of the file is this line
return "rendernode/mentalray/internal";
and you need to change it to this
return "rendernode/mentalray/material";
When you restart maya, mip_rayswitch will be one of several new materials in the mental ray section (sadly lacking icons).
The job of mip_rayswitch is to help the renderer decide what content particular types of rays will contain. There are several ray types, but we will look at the "eye" ray and the "reflection"ray. The "eye" ray is what we see through the camera. The "reflection" ray is... I bet you can guess. So we want the fully colored shader to be seen by the reflection ray and just the reflections to be seen by the camera (the eye ray). And to get that we need the connection editor and the new mia_material_x shader.
mia_material_x is a more advanced maya2008 version of the maya8.5 mia_material. One of its new features is "multiple outputs" - meaning it has the ability to output a long list of components independantly. Here we are interested in only two of these called "result" and "refl_result".
mia_material_x.result is the "beauty" pass. Its what you usually see when you render it. On the other hand, mia_material_x.refl_result is just the reflection component of the shader. What we are going to do is create a shader network where the mia_material_x.result is used for the reflection ray in mia_rayswitch and mia_material_x.refl_result is used for the eye ray. This needs to be done for each shader.
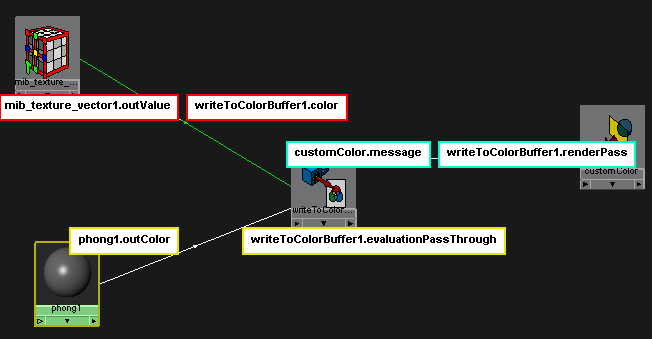
Here is a picture of the shading network with the important connections highlighted.
hyperShade
The mip_rayswitch is hooked up to the shadingGroup's mentalray material
shadingGroup_attr.jpg
Now if we rerender that reflection pass we get this
refl_result_withSelf.jpg
Now we have colored reflections, but only the reflections.
Here is my maya scene file if you want to have a look.

Specialized passes: Material ID, Object ID and UV Pass – Tutorial

bài nguồn từ trang http://www.pixelcg.com

When outputting to composite rendered passes, it can be very useful to have the ability to select your render components by types.

In this example, we are going to explore how to output render passes per material and per object.
ninja_masterbeauty.jpg
Material ID

The term “Material ID” is commonly used when the render passes output the render per material.

For example, in this scene we are using 5 shaders. The objective is to have 5 different color variables for easy selection/isolation in the compositing phase.
ninja_materials.jpg
Maya 2009 comes with a built-in ability to do so in the form of render pass. This pass is called “Diffuse Material Color”. However, if you are using multiple objects that share the same color or one of your shaders has a texture node attached to the color, this approach may not be ideal. Thus, the need to use a custom color buffer.

We start by adding a custom color as a render pass.
cuscolorpass.jpg
Open the Hypershade and create multiple “writeToColorBuffer” nodes that match the same number of shaders you have in the scene.
colornode.jpg
In the Hypershade, middle-mouse drag the shader on top of the writeToColorBuffer node and choose “Evaluation Pass Through”.
tocolor.jpg
Repeat the above step for each shader.

In the Attriubte Editor for each of the writeToColorBuffer nodes, choose customColor as the Custom Color Pass. For each material give a unique color value thus making the material different even if they share the same color value or have a texture assigned to them.
writetocolorattr.jpg
This is the result:
material_id.jpg
Object ID

The same concept applies to the object ID (aka label ID). That is, the need to be able to select part of the rendered image based on pre-defined “labels”. Currently, Maya doe not have a direct solution for this pass, however it can be done by using multiple techniques.
Method A- Pre Maya 2009 render passes

Select all the objects that you wish to include in the pass, and execute the following MEL script:

addAttr -ln miLabel -at long -k 1;

This will add a new attribute (called “MI Label”) for all the objects in the Extra Attributes section:
milabel.jpg
In this example, we have 11 different objects in the scene. Once we create a different “MI Label” for each object, we will assign a different ID value, thus making each object unique during render time.

Select the render camera and under the mental ray section > Output Shaders, select the Create button. This will create a mentalrayOutputPass.
cam_shader.jpg
Change the Frame Buffer Type to “Label (Integer) 1×32 Bit”. Note: you can change the image format and the name of the pass according to your needs.
campass.jpg
The result will be a separate rendered file in the format selected in the Image Format field.
obj_id.png
Method B – Custom Depth

In this approach we will use a custom depth pass to determine our object ID in the scene. This approach works best when the objects have a noticeable distance between each other.
render_color.jpg
We will start by adding a “Custom Depth” pass in our associated passes.
customdepth.jpg
In the Hypershade, we will add multiple “writeToDepthBuffer” nodes. These nodes can be found under the Miscellaneous section of the mental ray nodes.
depthnode.jpg
We will connect the “.outColor” attribute of the Shader to the writeToDepthBuffer’s “.evaluationPassThrough” attribute.

In the Attribute Editor of the writeToDepthBuffer, change Custom Depth Pass to the custom depth pass node that we added in the Render Settings.
hyper_pass.jpg
For each writeToDepthBuffer node we will give a different value for each Depth.
writetodepthattr.jpg
Once we render the result will be like this:
depthresult.jpg
UV Pass

This workflow will allow the user to select parts of the geometry based on their UV shells.

In this example, this geometry has multiple UV shells (11 in total) and all located in the 0-1 region.
uv_shell.jpg
We will start by creating a Custom Color Pass (same as above) and adding a “writeToColorBuffer” node in the Hypershade.

In the Hypershade, midde-mouse drag the shader on top of the writeToColorBuffer node and choose “Evaluation Pass Through”.

In the Attriubte Editor for each of the writeToColor nodes, choose “Custom Color” as our Custom Color Pass.

In the Hypershade, under the mental ray Nodes > Textures section, create a mib_texture_vector node. Then add it to the Color value of the writeToColorBuffer node.
uvconnection.jpg
In the mib_texture_vector node, change the “Project” to “uv”:
mib_tex.jpg
Now when you perform a render, you will get a color variation based on the UV shells of your mesh.
uv_shell_color.jpg